Saturday, March 25, 2017

2017 March Meet

Last weekend was the annual “March Meet” (the 2017 O scale meet) held in Lombard, Illinois.

The traction offerings were surprising in that there were far more than I was expecting. I saw a decent amount of Chicago Surface Lines, some Illinois Terminal, several Milwaukee Electric pieces, a bit of Chicago, Aurora & Elgin, a few Chicago Transit Authority cars, plenty of the ever popular North Shore Line, and a few others that I cannot recall offhand. I counted a minimum of four Electroliners for sale: all of them 801-802.

My main interest was a CTA 1-50 series car. Acquiring this would bring me up to a total of 3, which is what is needed in order to build a 1-50 and a 60. I arrived on Saturday morning and learned (much to my disappointment) that there was one at the show, but it had been sold “almost immediately” the previous day. Apparently these cars are hot-ticket items. The other CTA offerings were 6000 series sets. One—a flat door 6—was a brass set available for $900 while the other—a 6200 with curved doors—was an MTH model. Like their 3200 series cars, the 6000 series cars they produced are from their lower quality Railking line, are slightly oversized for O scale (they’re closer to 1:45.2), and are built for 3-rail operation. The detail on these cars is significantly better than on the 3200s.

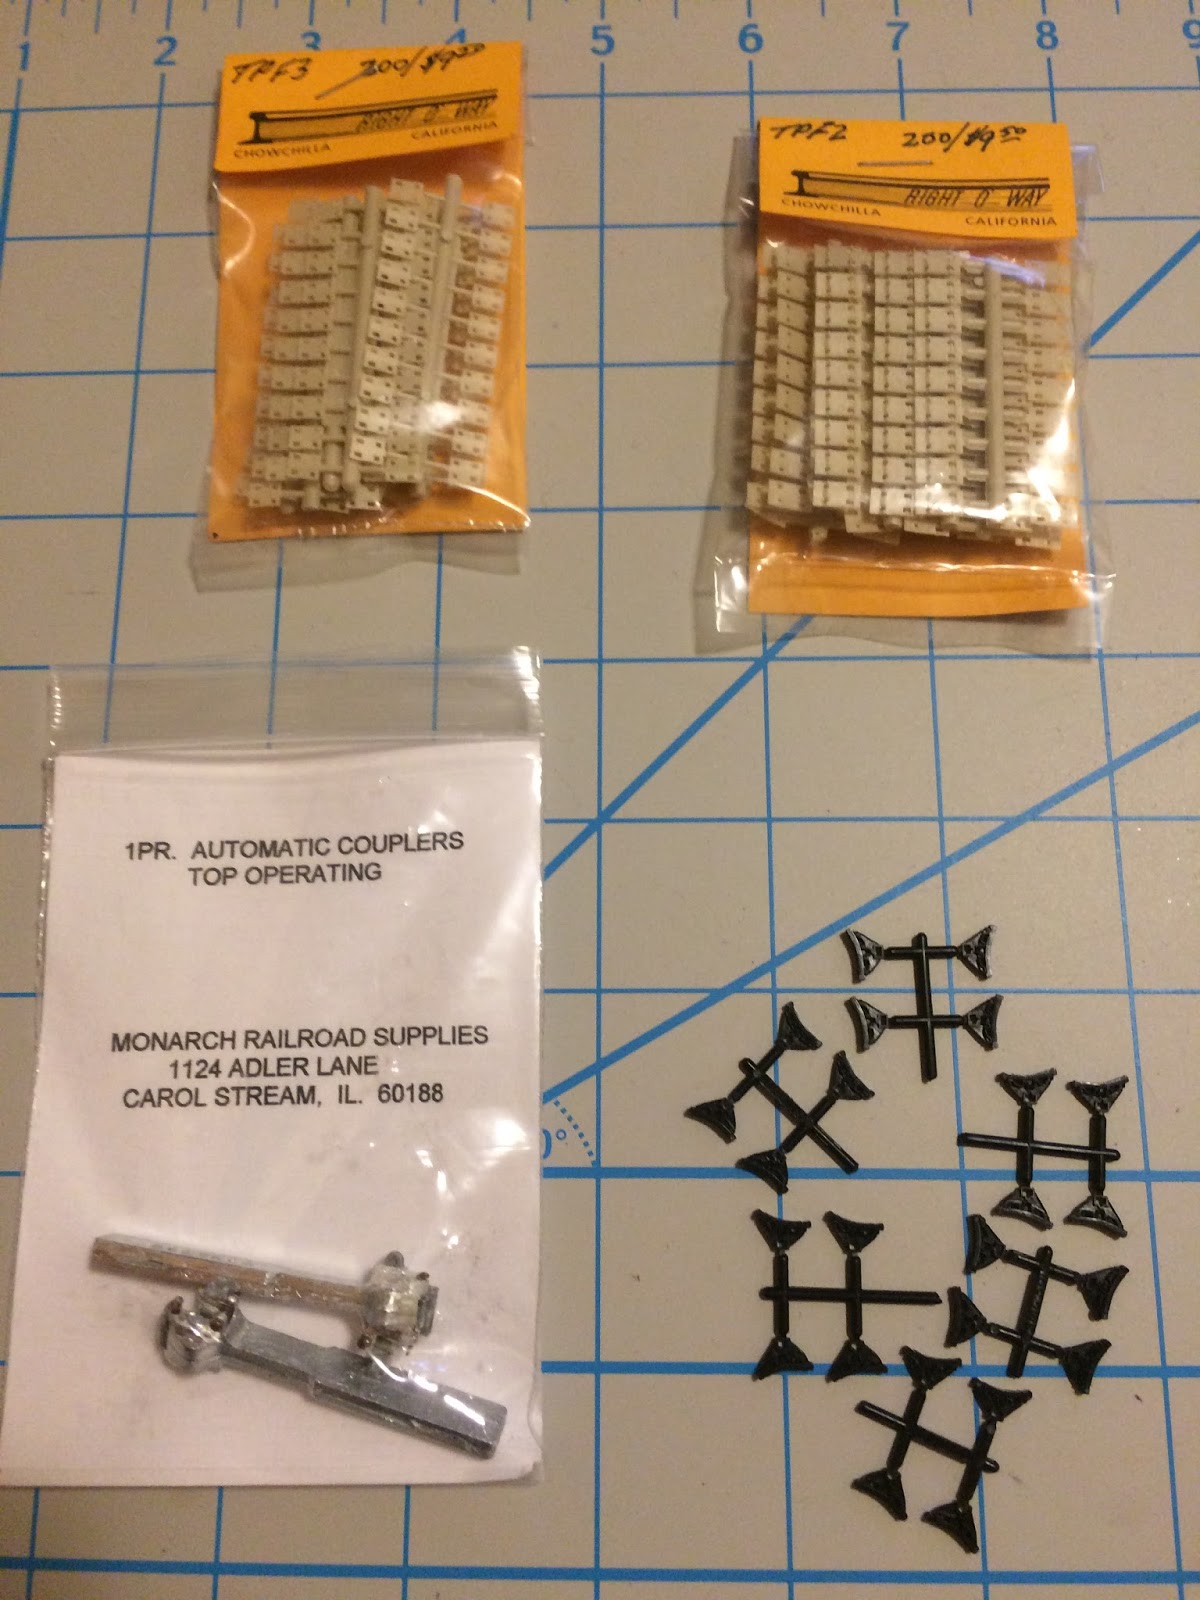
At the end of the day, I walked out with yet another brass CA&E 450 (I have five now), the MTH 6200 series set, two packets of tie plates, a pair of knuckle couplers, and twenty four plastic brake shoes.

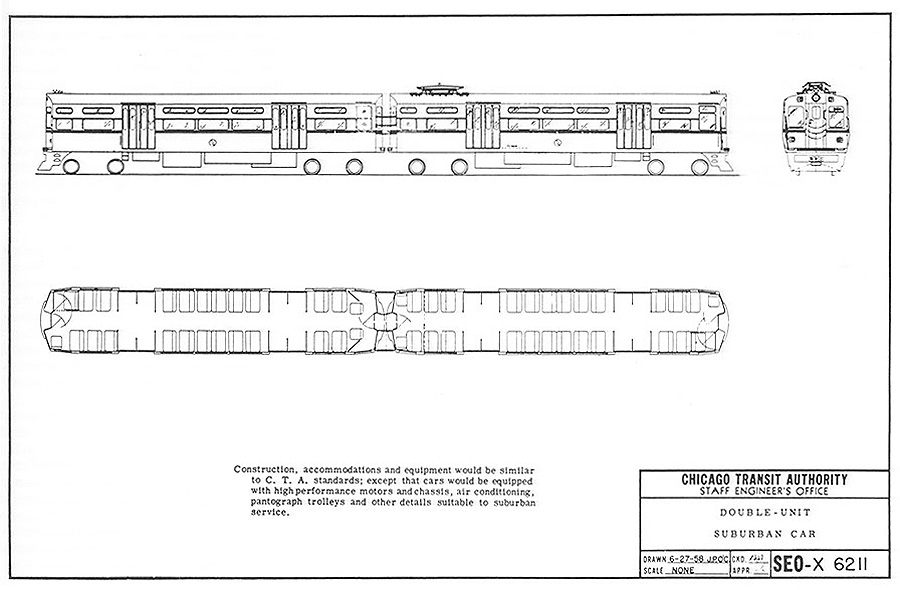
When MTH originally released the 6000 series sets I wanted to get an unpowered pair to modify into the “double-unit suburban car” drawn up as part of CTA’s halfhearted proposal to assume operation of the North Shore Line. The idea was that the MTH cars would be a cheaper alternative to buying and cutting up a brass 6000 set, but as these sets became increasingly harder to find, I scrapped the idea entirely. Of course, now I have a pair.

The CA&E 450 will fit in nicely with my other CA&E steel cars (four other 450s, four 400s, and two 420s). I haven’t decided on what consists to develop these into.

The tie plates are from Right-O-Way and will be used for the ties supporting the third rail chairs. Since Old Pullman went out, I’ve been looking for a replacement and have heard good things about Right-O-Way. Given that my layout will be a section of the “L,” the third rail will be a necessary aspect of the project. The initial track section will be made with flex track, but given the construction techniques employed on this section of the rapid transit system, every fourth (or fifth) tie will need to be removed and replaced with an offset tie which will support the running rails and a third rail chair. The replacement ties will get these plates to keep the uniform look of rails held in place with spikes and plates.

The knuckle couplers are made by Monarch and will serve as a test for “close enough” couplers for the middle of a North Shore train. They were six dollars for the pair.

Surprisingly, the thing I spent the least amount of money on, and the thing I wasn’t looking for ended up being the purchase I am most satisfied with. These would be the plastic brake shoes. From its inception, equipment on the Skokie Swift was provided with “wheel scrubbers” (or “scum busters” depending on your preference of terminology) to ensure positive contact with the running rails. These were brake shoes that were applied to the edges of the wheels to provide a small amount of friction to remove and prevent an accumulation of dirt and debris. Now that the catenary wire has been removed, they are no longer needed or in use. They're a tiny thing that helps make a “Skokie” car, a “Skokie” car and I had forgotten about wheel scrubbers until I saw these guys.

Friday, March 24, 2017

2016 in Review

“The reports of the Dunsel Line’s demise are greatly exaggerated.”

While it started off rather well, 2016 was ultimately not a great year for modeling for me. Contrary to what the lack of updates may suggest, there has been progress over the past year. Some projects have inched forward, while others have not. What follows is a smattering of what has been accomplished since March 2016.

CTA 52 (Skokie Swift)

The underbodies of all three sections have been primed, leaving the bodies of the A and A1 sections of the car in their natural state. A resistance soldering unit was acquired from the defunct Chicago & Utopia shops and made short work of the trolley shrouds and brass roofboards. (I left the boards on one section for the time being as a reference point.)

Very recently, I ordered the Chopper III from NWSL and made short work of a set of styrene strips that will become the new roofboards. It is a very nice little tool that I expect to put to good use. I still have to get the dimensions of the “saddles” (the supports for the boards) and fabricate them before I can continue.

The PCC cars that were “Skokie equipped” were given sets of curved horns that I had long searched for as a commercially available product. This search was in vain. The 5000-series cars carried these horns on the roof near the destination/route sign meaning that they were generally out of reach. On a trip to the Illinois Railway Museum, however, I discovered that an accessible pair of 6000-series cars was equipped with these as well and that the horns were beneath the anticlimbers. Not long after returning with pen, paper, a tape measure, and a few other odds and ends, I had a set of 3D printed horns arriving at my office.

CTA 3200s (Skokie Swift)

After the last printing of the front section resulted in a less-than-optimal print (and also turned out that I’d made a mistake and made the piece too short) I have gone back and decided to redesign the whole thing (front and back). The rear portion looked good, however the brackets that support it didn’t fit into the grooves on the roof. This was something I had never intended and just figured I’d work around it, but with the needed redesign of the front, I figured why not correct this too? In all, it required an increase in width of 1mm. The difference is small enough that it shouldn’t be visually noticeable, but should prove to make the fit much better and easier.

After printing and priming a partition with closed cab door, I discovered that pipe filters would make an excellent filler for the cab door window. (The small window in the door has a crosshatch in it.)

Another advancement came with the announcement that NWSL had finally come out with the Stanton drive in O scale. The downside was that the wheelbases offered (8’-0”, 8’-6”, and 9’-0”) were too long for most traction applications, but after emailing them, I was informed that S scale drives were available that were capable of accepting O scale wheel sets and that the wheelbases offered (same as for O scale) would scale out appropriately for O scale traction applications. I promptly ordered a pair of these with a 9’ wheelbase with 30”/145 flush axle wheels. For the 1:45.2 size of the car, the trucks are slightly too short and the wheels are slightly too large, but this is by far close enough and well worth the avoidance of the headache of building my own. When complete, each car will have the rear truck powered so that the ends can have visually appropriate trailer trucks.

CNS&M 170 series cars (Shore Line train)

I make no attempt to hide the fact that I am a novice modeler from others or (more importantly) myself. Given that I recognized the simplicity of some of the North Shore cars and decided to put some effort on these.

Unlike the CA&E, there are no multiple unit connections needed for proper trolley operation and trailer cars only need power for interior lighting. With the completeness of the brass models, this reduces the project (for the most part) to painting and wiring (and the wiring will be simple due to its minimal nature). This made it a great starting point. I began priming one of the two models before remembering that the trolley hooks need to be removed and insulated for proper operation. The trolley hooks on these consist of a bent wire that runs through the boards and into the roof where it is secured in place. Unfortunately it was not secured with a bead of solder so it could not be removed by heating the area and pulling without damaging the hook. Instead it needed to be removed, which was done with a Dremel. (I’m short on parts for this, so this is as far as I’ve gotten.)

3D Printing

It came to my attention that Bestine, the solvent used to remove the waxy leftovers from the 3D printing process is no longer made. I didn’t hear about this in time to stockpile it before it was all gone. The search for a pure heptapane replacement is ongoing.

Layout

There has also been decent progress on the benchwork, which is almost complete. All that remains at this point is installation of the legs, shelf brackets, and the two storage shelves. (Sufficient funds and access to the proper tools are the two things holding this back at the moment.)

The section under construction is going to feature the North Side Main Line embankment as it passes through Edgewater. This is a four track structure with island stations. I toyed with the idea of throwing in some crossovers, but decided to leave it at four straight tracks and I’ve acquired the track and subroadbed for this.

I’ll endeavor to put forth more effort in both modeling and maintaining this blog in 2017!